Age Verification
This website contains age-restricted material including nudity and explicit content. By entering, you confirm being at least 18 years old or the age of majority in the jurisdiction you are accessing the website from.
I am 18+ or older - Enter
I am under 18 - Exit
Our parental controls page explains how you can easily block access to this site.

Últimos mensajes - Página 1755

  Foro

HombreSinSombra
Desde en Oct 2010
6382 posts

Fullscreen: 'inout' entry from the left, and asymmetric card mirrori

Todo sobre iStripper
July 9, 2015, 9 respuestas
2 ways to change this.

You can either select that line of code in the .scn file and delete it. Or at the very beginning of that line of code, insert 2 forward slashes (//). This 'Comments' out the code. Meaning that those 2 forward slashes, in this language mean that you are adding dialogue to the code rather than an active part of the program. You are 'commenting' on what you're doing :)

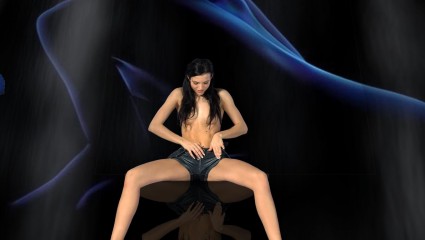
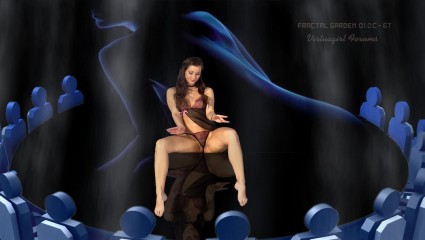
First of all, all clips are recorded as entering from the right. If you've seen the pics of the Paris studio setup, the girls always enter from the right side.This will produce any words/ lettering correctly.

Strangely enough, in normal desktop mode, this is usually switched to the the mirror image. I have no idea why...

I've watched many demos and they always seem to appear from the left, reversing the original recorded images

Using Fullscreen mode, the entry direction can be changed. From the left, do nothing and I believe all clips will be reversed. Ie., Any visible letters will be reversed. OR, using scale: -1, 1, 1, added to the 'clipSprite' (The Models) part of the code edited using notepad or a similar text editing program, the girls will be viewed as the original recording.

For the bravehearts out there, if you only have the included scenes that come with the download of version 1.2.0.84 (.85 for Mac), try this: ( Anybody who has more scenes should already know this stuff so, switch off now ;) )

Open your usual GUI (Graphical User Interface) be it VG or DB. Then select Advanced/ Fullscreen. This will now show you the choices of Fullscreen scenes you have available/installed.

At the bottom left, there's a newish button called, 'Open scenes folder.' Click this and it'll take you to where all your scene files are stored on your hard drive.

Ok. Now for the tricky stuff... Pick a folder that you want to change and open it. If you picked Paris Penthouse Club, you'll see these folders:
The standard yellow folders called Multi and Single. These contain images for the scenes. Below these there are these 3:

Multi
Single Sit
Single Standing

These are .scn files and they control the Fullscreen scenes.
You can right click on any of these ( In Windows, they have a cute little blue notepad icon) and then open with: Notepad or a similar text editing program.

Now. You are going to see a lot of plain English text, all commented out (//) which is very useful when you start out with fullscreen creation but for our current purposes here is useless. If you haven't seen code like this before then don't worry! It's all actually pretty simple to learn :)

You'll see at the beginning, after all the blurb, explaining what needs to be done, parts of the active code.

For this explanation, ignore all of that and scroll down till you see this:

You'll see lots of references to Texture, Camera, The Bar, Sprites, Lights, etc.

When you get to, ' clipSprite', now we're in business!


clipSprite {
pos: 0, -150, 20
source: Clip
standingHeight: 700
sittingHeight: 550
resolution: 20
material: true
scale: -1, 1, 1
}

This clipSprite chunk of code is the part that determines how the models are displayed in Fullscreen mode. We have an amazing amount of control over these chunks! That's for another day tho.

This chunk was taken from the Paris PC code, slightly modified by yours truly. (I added the scale bit and if I remember correctly, the sittingHeight part) I probably altered both height settings too, as is my wont :)

This should really be in the Beast's Tutorial thread but what the hell...

For this thread, the important part is at the bottom. ( scale: -1, 1, 1) These 3 numbers signify X, Y, Z. X is horizontal, Y is vertical and Z is depth. If you want your girls entering from the left, and reversed lettering, you can either delete this line completely or put 2 forward slashes in front of it. Like this:

//scale: -1, 1, 1

If you don't see this line of code in a given scene, then all your girls will enter from the left and be mirror images of the or
Number6
Desde en Oct 2010
3612 posts

Fullscreen: 'inout' entry from the left, and asymmetric card mirrori

Todo sobre iStripper
July 9, 2015, 9 respuestas
@DrDoom9

Not exactly an expert I'm afraid but I have done one or two scenes.

Unfortunately the documentation on full screen, apart from the stuff done by the members (e.g. @Wyldanimal's tutorials), is woefully lacking. It is limited mainly to the comments that were put in the original Totem Scene files.

I still haven't worked out why the clips in Full Screen are mirrored but you are quite right in that you have to use a negative scale factor or a rotation to get around it. Sometimes I forget and it is not until I get a clip with text on that I notice so I usually go back and edit the scene. If I specifically want the girl to enter from the left then I leave out the scaling/rotation and live with the reversed text. Alternatively, on occasion, I have flipped the background image right to left so that the girl can enter from the right with a similar effect to that as if she was entering from the left.It depends on whether or not the background is suitable for flipping.

In Hombre SIn Sombra's scene I 'm not sure if it was an error or he intended it to be a comment and forgot to put // before it. As far as I know "enter" is not a keyword that can be used.

To add more *****, I think Totem have slightly FUBAR'd the "inout" on the 3K cards. I was concerned early on that there was no "inout" in the early 3K cards, consequently scenes set specifically for "inout" would not play 3K clips. They now appear to have added "inout" to 3K but it does not function in the same way. For non-3K cards and "inout", the girl enters from the right (or left depending on the scaling/rotation) and moves to centre of the stage. Consequently the clipsprite is normally positioned at the centre of screen and the girl appears to walk across the stage.

With the 3K cards "inout" is intended to have the model right at the edge of the screen so she appears to be entering from the side of the monitor. i.e. you will see an arm or a leg appear followed by the model and occasionally she will move back forth in and out of view, disappearing and reappearing from the edge of the monitor. Consequently if you have "inout" clipsprite set for the older cards, when a 3K card comes up you get an arm or a leg appearing out of thin air in the middle of the screen, which somewhat spoils the effect.

Sorry that I am unable to answer your problem regarding getting around the right/left mirroring but I hope the above is of some help when trying to construct a scene using "inout".

If anyone else knows of a way around your problem I am sure they will let you know.
TheEmu
Desde en Jul 2012
7424 posts

Share your FullScreen - Member Created Scenes here

Todo sobre iStripper
July 6, 2015, 2695 respuestas
I have just uploaded a number of updated zips tp TheEmusNest.eu and the direct links to the updated files are
  • http://www.theemusnest.eu/scenes/Zips/GlslSandbox%20Scenes/GlslSandbox.zip

  • http://www.theemusnest.eu/scenes/Zips/ShaderToy%20Scenes/ShaderToy.zip

  • http://www.theemusnest.eu/scenes/Zips/Experiments/Tunnels.zip

  • http://www.theemusnest.eu/scenes/Zips/TheEmusTunnels.zip

  • http://www.theemusnest.eu/scenes/Zips/TheEmusTransmats.zip
The updates to the GlslSandbox and Shadertoy zips comprise
  • a few newly adapted scenes

  • several shaders have been modified to have transparent backgrounds
    rather than black, grey or white so that you can put clips behind them

  • the shaders I use for the Transmat scenes have been optimised
The optimised shaders have then been used in the Experiments with Tunnels and the Tunnels and Transmats scenes. Previously the Transmat C series were just about as much as my laptop's Intel Integrated Graphics Processor could handle though it was no problem for the NVIIA GPU, but with the optimised versions these scenes are perfectly smooth using either GPU

I have modified the Transmats by tweaking the opacities so that the fire tunnel is less overwhelming and the girls spend a little more time at each destination.

I have also included a new Transmat D set of scenes where an additional effect is seen, this being a set of "echoes in time and space" of the performers which fade in, grow and fade out while the transmat is operating.
TheEmu
Desde en Jul 2012
7424 posts

Discussions for Scenes for Version 1.2.X Fullscreen Mode here

Todo sobre iStripper
July 5, 2015, 5053 respuestas
@EverthangForever

In the edit to your previous post you said "I'm wondering if the Complex Functions shader is having difficulty rendering some of the more concentrated iterations."

I assume that you are talking about the result of using the Complex Function shader when using it to distort an image. If so then what you are seeing as "jaggies" are probably due to the finite pixel sizes involved. In principle this could be overcome by using a much higher resolution for the original image - but that is not practical. The problem is exactly that which used to be seen when rescaling any digital image or font, but which is much less often seen nowadays because anti-aliasing techniques are used. It would be a good idea if anti-aliasing were built into the Complex Functions shader, but I do not have it as a high priority on my "to do" list.

Update: What happens when you use a "texture" is that when the shader is determining the colour to use for a particular pixel in the image being generated it determines what point in the texture image corresponds to the pixel in the final image and uses its colour. In general this will not correspond exactly to a pixel in the texture and the actual colour used will be some sort of average over the nearest pixels in the texture. This is done by the GLSL function texture2D.

This works quite well if the texture image is smaller than the image being generated (though a simple minded averaging can lead to a blocky final image) but has problems when the texture image is much larger than the image being generated. In this case two neighbouring pixels in the image being generated may correspond to widely separated pixels in the texture. Because they are widely separated any averaging over neighbouring texture pixels does not help because the two points in the texture are too far away from each other to be neighours.

Strange as it may seem you might actualy get a more smoothly coloured result by using a smaller texture, but of course you then ***** from the lower resolution in those parts of the final image that are not affected by the relative scaling of the generated image and the texture. As I mentioned above probably the best thing to do is to apply an anti-aliasing step to the final image.

Things are, of course, rather more complicated than what I have described, but it gives the gist of the problem.