Age Verification
This website contains age-restricted material including nudity and explicit content. By entering, you confirm being at least 18 years old or the age of majority in the jurisdiction you are accessing the website from.
I am 18+ or older - Enter
I am under 18 - Exit
Our parental controls page explains how you can easily block access to this site.

Letzte Beiträge - Seite 1728

  Forum

Number6
Mitglied seit in Oct 2010
3614 Beiträge

Discussions for Scenes for Version 1.2.X Fullscreen Mode here

Alles über iStripper
11. November 2015, 5053 antworten
@DrDoom9
Another approach may be to use PingPong rather than loop forward. Unfortunately I have some work related problems and I really haven't the time to play around with this.

Looking at the animation it appears that the jerkiness is caused by the loop forward command. It jumps back to the start position when the animation finishes.

If you use pingpong and double the animation time it will move forward at the same speed but then reverse its path for the same amount of time.

What I was thinking was having a second animation running in reverse. Start the second animation at the far end of the travel using the pingpong and run it in the reverse direction.

The trick then would be to vary the opacity of both animations (using pingpong again) so that they have negative opacity when they are running backwards. The time of all the animations needs to be the same and you may need to use some large numbers for the opacity so the switch from +ve to -ve is almost instantaneous at the crossover point.

For the first animation (the forward running one) you will need +ve opacity going negative and for the second animation, running in the reverse direction you will need -ve opacity going +ve. Using this method you should only see the animations when the are running in the "apparent" forward direction. They should more or less continuously follow each other, without the jerk back.

There will probably still be some discontinuity and I doubt you'll be able get it absolutely perfect using this method but it is the only thing I can think of (other than @EverthangForever's suggestion).

By the way you didn't actually post a link to the scene. That could make it difficullt for anyone who doesn't know the address for @Wyldanimal's website.

Good luck and I hope you manage to solve the problem. It is a very interesting scene and you have obviously put a huge amount of work into it. I love the dead bloke on the far conveyor. It vaguely reminds me of a James Bond movie - particularly with the all the girls :-)
stefnev1
MODERATOR
Mitglied seit in Jul 2008
17186 Beiträge
EverthangForever
Mitglied seit in Oct 2009
4469 Beiträge

Discussions for Scenes for Version 1.2.X Fullscreen Mode here

Alles über iStripper
11. November 2015, 5053 antworten
@DrDoom re your new SCN

There would be quite a bit of artwork required so with limited time, I will just describe how I would try to 'fix' the bend in the baggage carousel.
I would try to make the belt run right to left. eg: for source: FrontBeltStraightB0extended
pos: 937, 505, 0 //start
//animate: 40, LoopForward, Linear, pos, 915, -86, 0
animate : 40, LoopForward, Linear, pos, -915, -86, 0

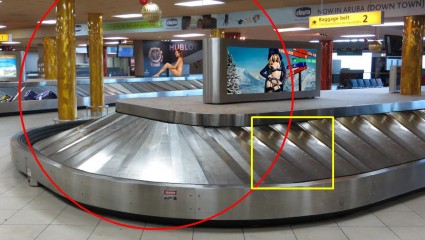
The red circle represents a radial disk at rot: 0, 0, 0 placed below ALL other textures. The 'FrontBeltStraightB0extended' is placed high up in the code so to be still under all the peripheral masks and the new disc. The new clockwise rotating disk is rendered radially to match the stainless steel belt texture.
say...
hotspot: 0.5, 0.5
size: 1600, 1550 (approx)
pos: -100, -760, 0 //(approx)
animate: W, LoopForward, Linear, rot, 0, 0, 360 //where W = timing in seconds to match Straight belt anim speed.

The yellow rectangle represents a mask over the red outlined disk . The mask comprises 2 textures
Because the straight belt moves continuously right to left at a fixed rate masking requires 2 images.
One portion (a static texture of a small obliquely ridged link section of the belt) only is put inside the yellow texture area hard up against its left side. Another mask is placed over that with a timed short linear animation right to left with just enough time to engulf the tiny oblique section underneath just before it loops forward again. NB: Whatever time you set for this small animation, the total time for straight belt to cycle, has to be an exact multiple of this time or everything will gradually get out of sync..

The straight run of the belt passes right to left under the 2 masks described above and is also below the rotating red outlined disk. The 'stainless steel' red outlined disk, if drawn & positioned correctly should replace the content of your previous 'frontbelt' series of pngs, dealing with the bend.

The complications are that more masking/sequencing of textures may be required to deal with incursions of the large 'carousel-bend' disk texture, with any existing unmasked areas of the SCN background. If you keep thinking of the sequence of texture declarations in any code as an upside-down version of the physical, you can't go wrong..Anyhow...I hope you have success and hopefully this suggestion might excite some other ideas/approaches :-)
stefnev1
MODERATOR
Mitglied seit in Jul 2008
17186 Beiträge