Age Verification
This website contains age-restricted material including nudity and explicit content. By entering, you confirm being at least 18 years old or the age of majority in the jurisdiction you are accessing the website from.
Our parental controls page explains how you can easily block access to this site.
0
Discussions for Scenes for Version 1.2.X Fullscreen Mode here Forum / Everything about iStripper
EverthangForever
Joined in Oct 2009 2584 post(s)
January 5, 2018 (edited)
Standing ovation @Wyldanimal.
It works like a charm now.!! I can also see where I went wrong.
Very much obliged for yours & others helps here maestros👍
It works like a charm now.!! I can also see where I went wrong.
Very much obliged for yours & others helps here maestros
Z22
Joined in Aug 2017 1166 post(s)
January 5, 2018
If you want to give yourself a fit change the multiplier to 120 :D
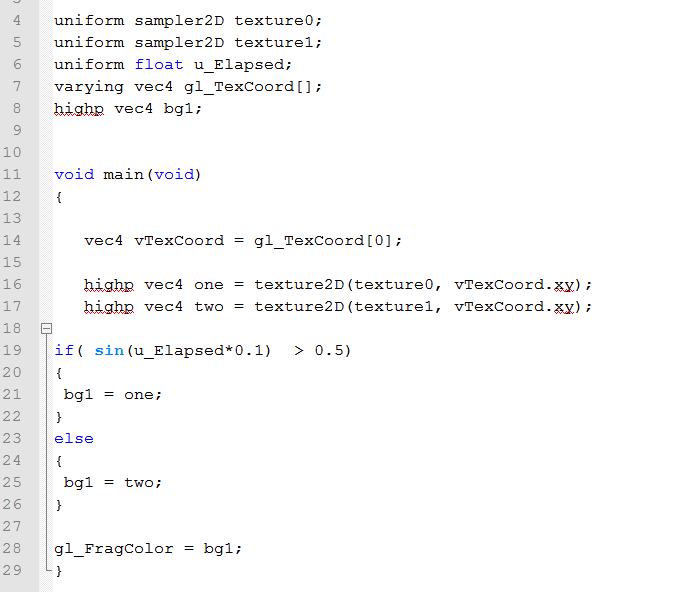
TheEmu
Joined in Jul 2012 3309 post(s)
January 5, 2018 (edited)
Shorter, slightly more efficient, and giving equal time to each background rather than biasing it towards one or the other, would be
uniform sampler2D bg0;
uniform sampler2D bg1;
void main(void)
{
gl_FragColor = (sin(u_Elapsed*0.1)>0.0) ? texture2D(bg0,vTexCoord.xy) : texture2D(bg1,vTexCoord.xy);
}
I have not tested it, but I can't see any typos.
This version, however, can not be so easily generalised as @z22's and @wyldanimal's suggestion.
Z22
Joined in Aug 2017 1166 post(s)
January 5, 2018
Well, the discard and stack layers in a 3d camera scene kind of works but i am getting a gray line around each layer for some reason. Any ideas as to why?
there are no light sources so it's not a shadow.
there are no light sources so it's not a shadow.
TheEmu
Joined in Jul 2012 3309 post(s)
January 5, 2018
Is it, perhaps, the result of feathering or antialiasing that blends the edges of the image with transparency to avoid jaggies? Maybe your processing has exagerated this if it is present in the first place.
Z22
Joined in Aug 2017 1166 post(s)
January 5, 2018
only thing the shaders are doing is discarding if out of bounds eg < 0.6 | > 0.71
Z22
Joined in Aug 2017 1166 post(s)
January 5, 2018
will pack it up so you can have a look
Z22
Joined in Aug 2017 1166 post(s)
January 5, 2018 (edited)
https://drive.google.com/open?id=1Z21JCkuDlipNI6t_ji2-ONjy7W-g5sb6
I probably don't need the > parts really, was just trying to fix one type of error.
I probably don't need the > parts really, was just trying to fix one type of error.
Z22
Joined in Aug 2017 1166 post(s)
January 5, 2018
I think it's something the the 3d camera is doing for some reason. It may work with a 2d camera but will have to figure out the x offsets
EverthangForever
Joined in Oct 2009 2584 post(s)
January 5, 2018 (edited)
@Emu, thanks lots for the alternate swap code.
Timing background changes accurately with some scenes
like the gaming ones is going to become critical.
Having settings as uniforms, is going to be extra good
to manage swaps too👍 .
Timing background changes accurately with some scenes
like the gaming ones is going to become critical.
Having settings as uniforms, is going to be extra good
to manage swaps too
Z22
Joined in Aug 2017 1166 post(s)
January 5, 2018
Changed it over to a 2d camera and the gray lines are gone... weird..
EverthangForever
Joined in Oct 2009 2584 post(s)
January 5, 2018
BoolyBeezKnees kudos @Z22 for da if else business👍
Z22
Joined in Aug 2017 1166 post(s)
January 5, 2018 (edited)
Working version
https://drive.google.com/open?id=10NqABfyui3GUmGujQ240DP-GGT2lfJjW
may need to increase the seperation a bit more.
might add more layers.
https://drive.google.com/open?id=10NqABfyui3GUmGujQ240DP-GGT2lfJjW
may need to increase the seperation a bit more.
might add more layers.
Z22
Joined in Aug 2017 1166 post(s)
January 5, 2018
I'm actually quite surprised it works at all.
Z22
Joined in Aug 2017 1166 post(s)
January 5, 2018 (edited)
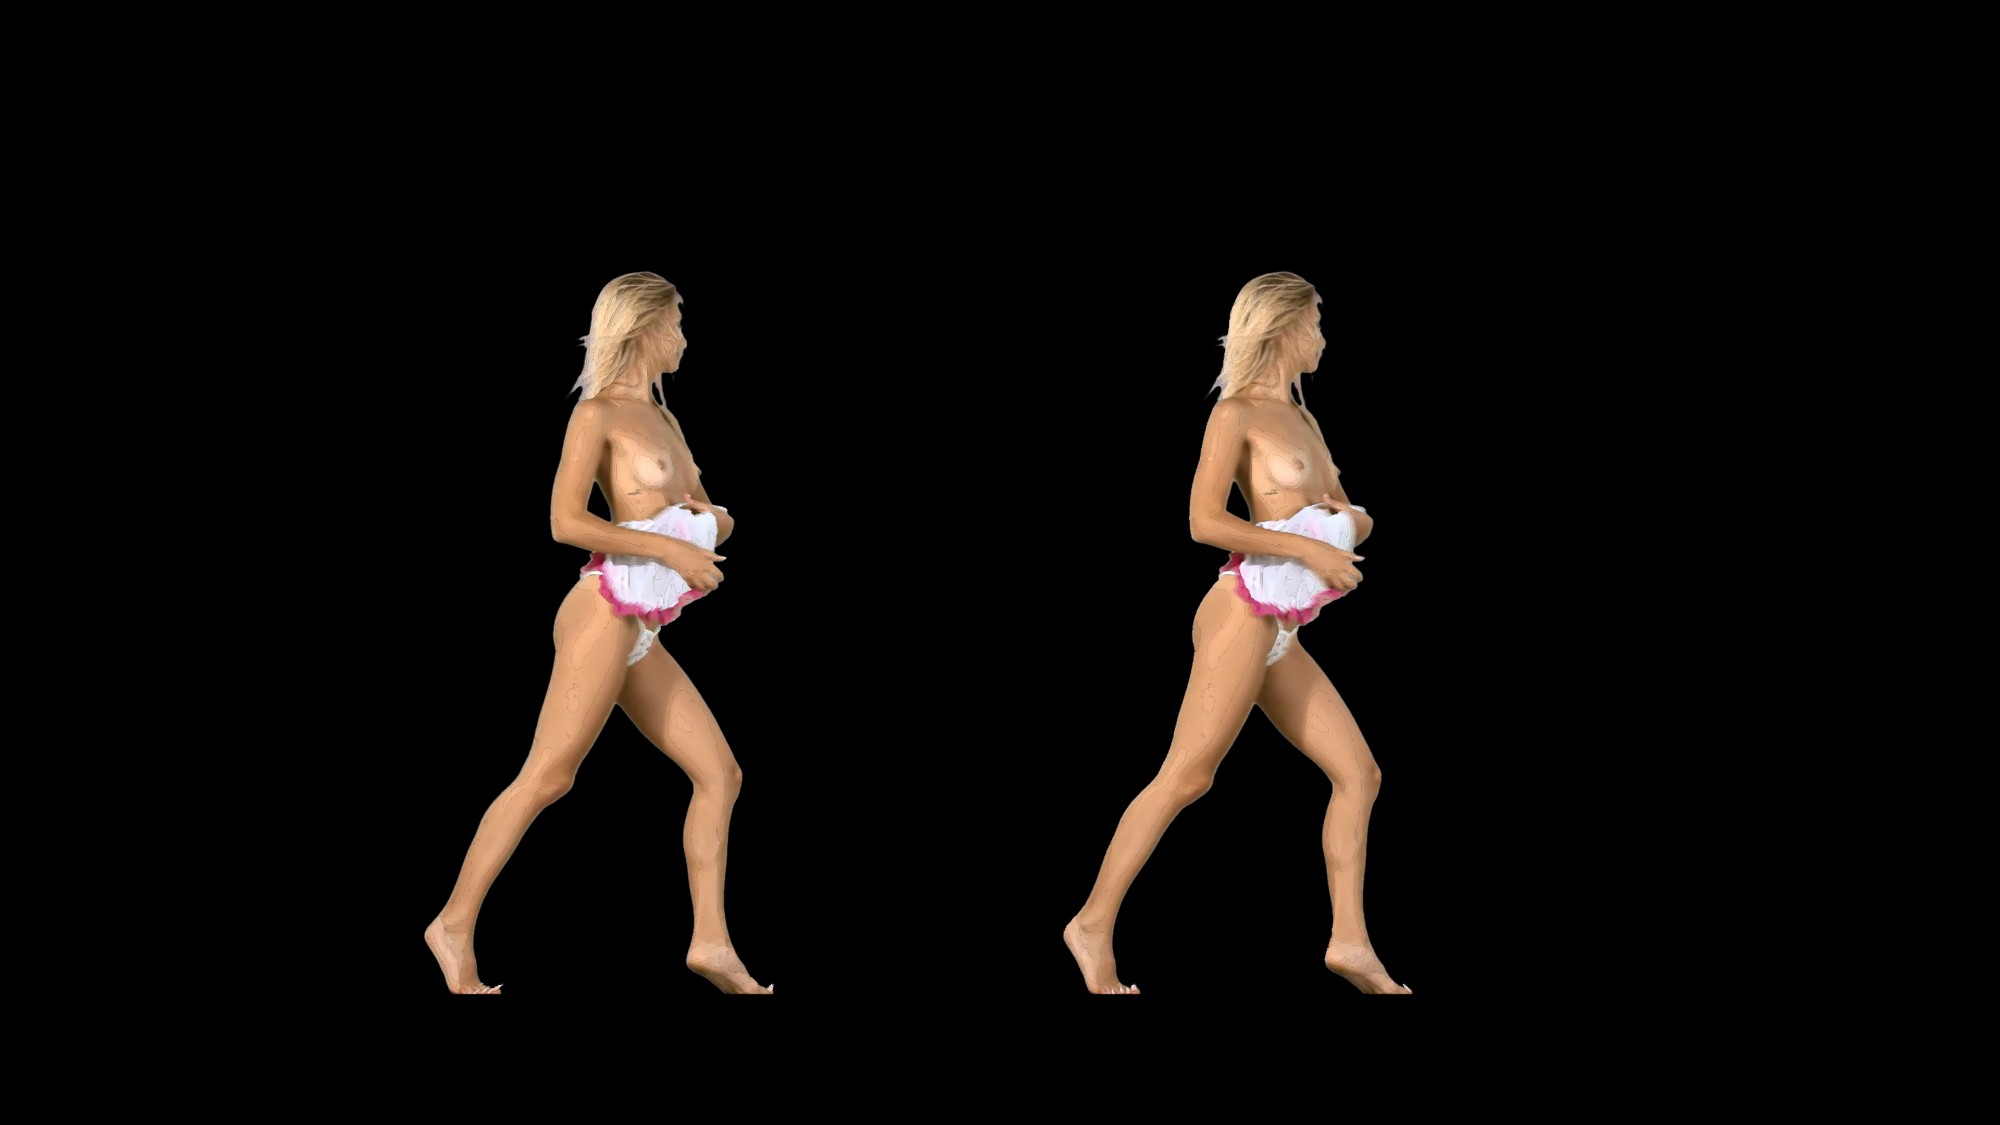
10 layer version
https://drive.google.com/open?id=1XWsxvLHOWF6DSFqFdTp_7tI8nPwOMxWn
removed pole clips as they ***** the crap out of my eyes.
https://drive.google.com/open?id=1XWsxvLHOWF6DSFqFdTp_7tI8nPwOMxWn
removed pole clips as they ***** the crap out of my eyes.
Z22
Joined in Aug 2017 1166 post(s)
January 5, 2018 (edited)
It appears to be the some kind of scaling that caused the gray outlines because if i have scale: 0.5, 1.0 in the camera 2d version i get the gray lines again....ffs
easy fix though, just moved the scale to the clip in the original framebuffer.
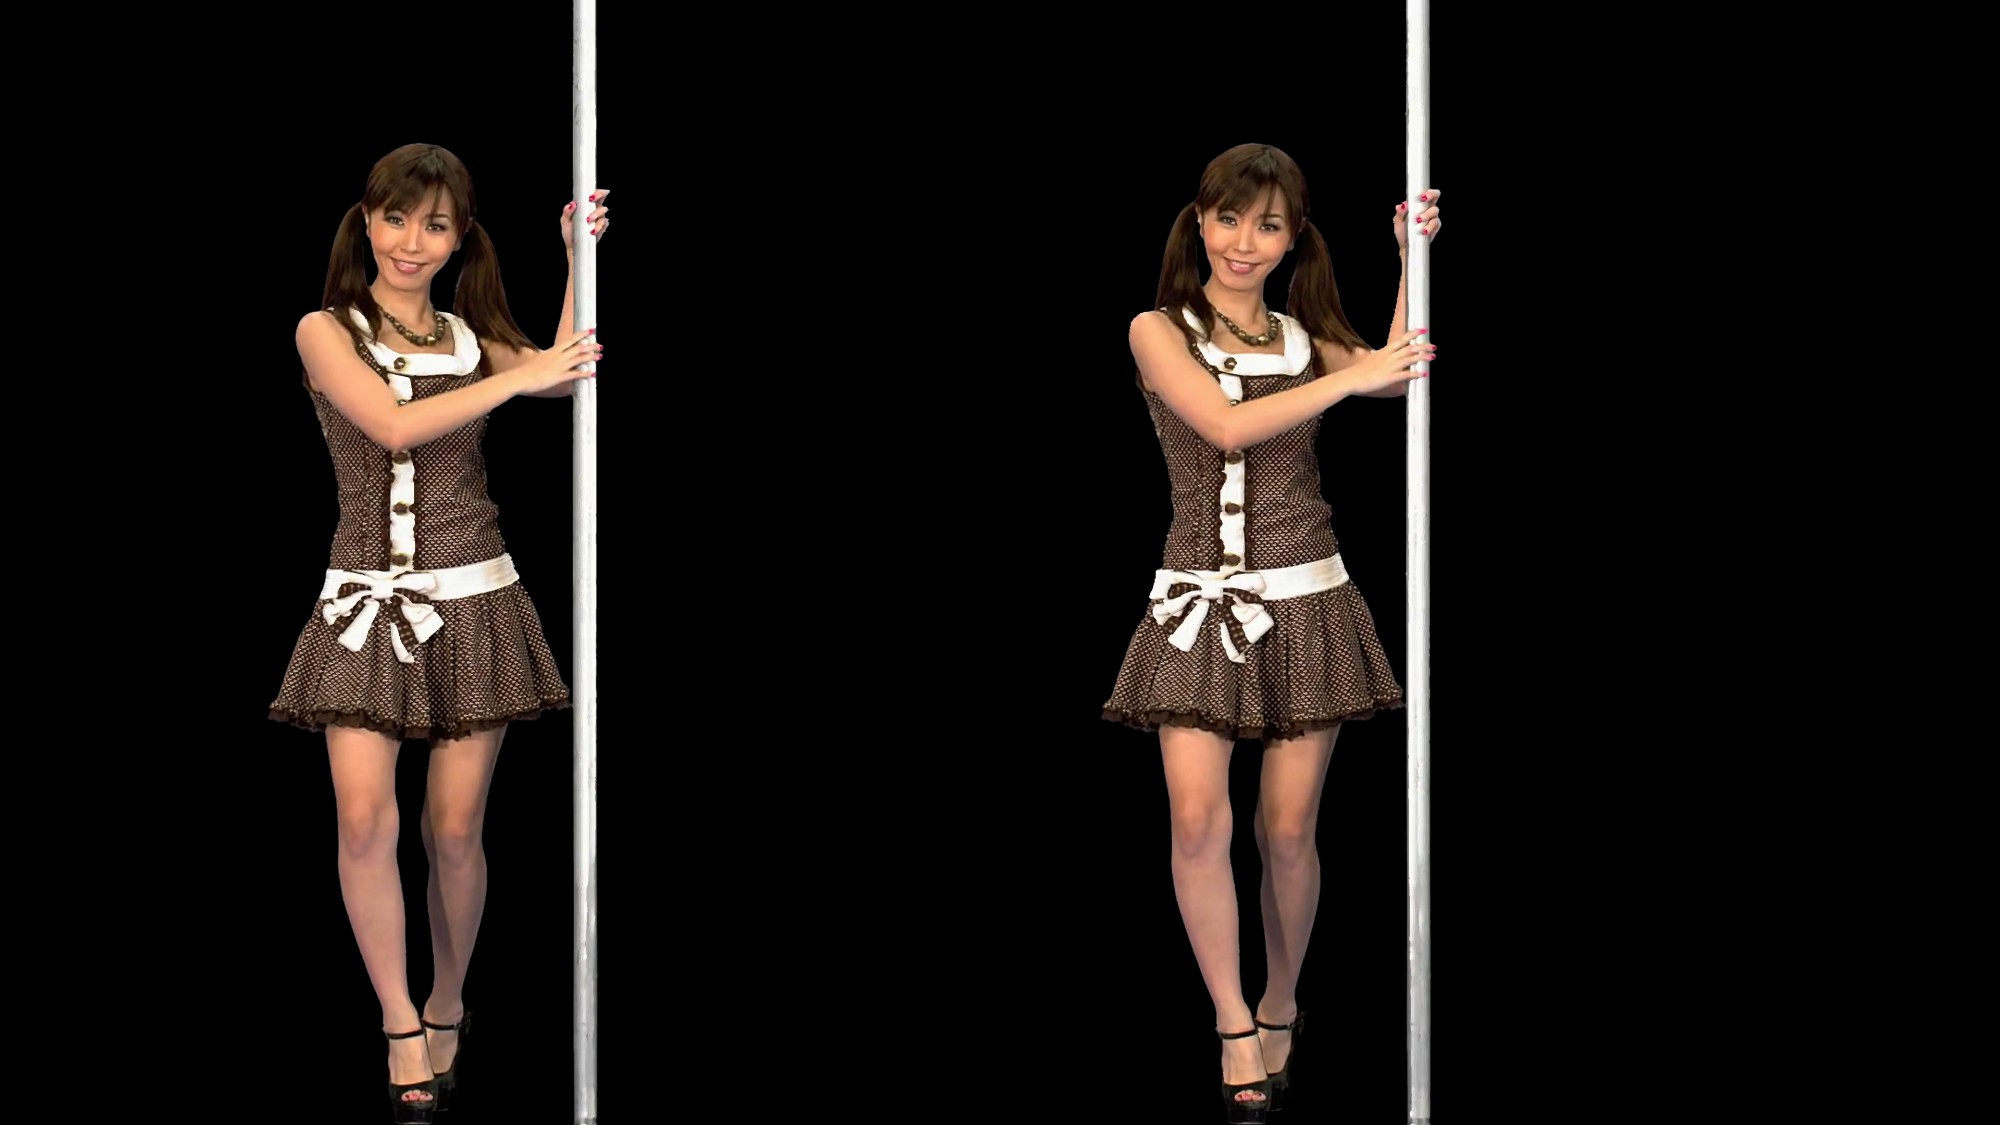
SBS version
https://drive.google.com/open?id=1kZLQL4RRhJSRILTL2RgtkT8BrjLCs_NA
easy fix though, just moved the scale to the clip in the original framebuffer.
SBS version
https://drive.google.com/open?id=1kZLQL4RRhJSRILTL2RgtkT8BrjLCs_NA
EverthangForever
Joined in Oct 2009 2584 post(s)
January 5, 2018
Have a 3D camera crosseyes version of the above @Z22 ?
OMG nice depth definition even with the gray lines..hmm I'll try may standingheight tad bigger...WHoa..!!
OMG nice depth definition even with the gray lines..hmm I'll try may standingheight tad bigger...WHoa..!!
Z22
Joined in Aug 2017 1166 post(s)
January 5, 2018
Posted "final" versions in the other thread...
Z22
Joined in Aug 2017 1166 post(s)
January 5, 2018
I wonder....
If i can move all the discards into one shader by setting alpha to 0 if the "if" is triggered rather than discarding and offsetting the layers in there before combining them for output. May be able to make a progressive scan 3d version by using the if else *****/flop we have been discussing and setting it so it swaps every frame. so "u_elapsed*60"
even without progressive scan it would make it easyier for others to use if it was just 2 shaders and 2 sprites.
Will give it a go later on...
EverthangForever
Joined in Oct 2009 2584 post(s)
January 5, 2018 (edited)
The 'if else' swap would need to be set for even timing perhaps or it might flicker some.
Nice going @Z22
Nice going @Z22
Z22
Joined in Aug 2017 1166 post(s)
January 5, 2018
Yeh, when i was messing with it before in the TLJ mirror expriment, i sometime had odd extra frames
TheEmu
Joined in Jul 2012 3309 post(s)
January 5, 2018
@Z22
That does sound like a very simple anti-jaggies mechanism that results in blending between neighbouring pixels, some of which are transparent, after scaling.
It appears to be the some kind of scaling that caused the gray outlines because if i have scale: 0.5, 1.0 in the camera 2d version i get the gray lines again....ffs
That does sound like a very simple anti-jaggies mechanism that results in blending between neighbouring pixels, some of which are transparent, after scaling.
EverthangForever
Joined in Oct 2009 2584 post(s)
January 5, 2018 (edited)
it would make it easyier for others to use if it was just 2 shaders and 2 sprites.Absolutely.! The less shaders used, and the more uniforms declared, the more portable it will be for existing .scn's to become mods.
@z22 the existing grey lines to me look very similar to the first time you played with the wet skin look.
the boundaries came up then like contour lines.
Z22
Joined in Aug 2017 1166 post(s)
January 5, 2018
@TE yeh, something like that anyway. know to avoid it now.
@ET I think with the wet look shader it was just down to how bright the overlay was rather than an unexpected error as this was. In this case it appears to be another annoyance that is out of our control... 2d camera doesn't have the same problem unless i do scaling in the camera node so it's easy to avoid.
@ET I think with the wet look shader it was just down to how bright the overlay was rather than an unexpected error as this was. In this case it appears to be another annoyance that is out of our control... 2d camera doesn't have the same problem unless i do scaling in the camera node so it's easy to avoid.
Z22
Joined in Aug 2017 1166 post(s)
January 5, 2018 (edited)
hmm, how to assemble 19 layers in a shader.... ponder...
may work...
if((Girl19.a) > 0)
{
gl_FragColor = vec4 (Girl19.r, Girl19.g, Girl19.b , Girl19.a );
)
if((Girl18.a) > 0 && (Girl19.a) == 0)
{
gl_FragColor = vec4 (Girl18.r, Girl18.g, Girl18.b , Girl18.a );
)
if((Girl17.a) > 0 && (Girl18.a) == 0 && (Girl19.a) == 0)
{
gl_FragColor = vec4 (Girl17.r, Girl17.g, Girl17.b , Girl17.a );
)
ect, ect...
TheEmu
Joined in Jul 2012 3309 post(s)
January 5, 2018 (edited)
@EverthangForever - for swapping backgrounds according to some schedule you could use one or more of the "Pulse_RGBA" shaders from my library. They only act on a single image but you could have a stack of sprites and control each of their opacities using the shaders - much like using animate: for opacity but much more flexible. These shaders allow you to set up a schedule of "pulses" for the R,G,B and A components, the schedule comprises an initial quiescent phase with no pulses, a phase where the pulses occur cyclicaly and a final phase quiecent phase. Each phase is optional. The pulses can be sharp edges or the edges may be softer.
Everything is controlled via uniforms that you can declare in the .scn file.
in the examples the pulses are affecting the overall brightness by pulsing the R,G and B components, but you would want to have them act on the A channel instead (or as well if you wanted a fade to/from black as well as changing the opacity). This is controllable via the uniforms declared in the .scn file.
They can be a bit heavy on the GPU due to their flexibility so at some point I intend to create simplified versions that, for example, only do sharp pulses or only do soft pulses or only act on the opacitycahnnel rather than have everything fully configurable at run time.
Z22
Joined in Aug 2017 1166 post(s)
January 5, 2018 (edited)
2 Shader 20 layer version
https://drive.google.com/open?id=1reo1b2BNde9Osa98j2_G10Naou0ohzFd
cross eyed and SBS versions
now includes insane if clauses...lol
https://drive.google.com/open?id=1reo1b2BNde9Osa98j2_G10Naou0ohzFd
cross eyed and SBS versions
now includes insane if clauses...lol
EverthangForever
Joined in Oct 2009 2584 post(s)
January 5, 2018 (edited)
@Z22 woohoo thanks 👌
@Theemu, thanks a lot, If peeps are looking for TheEmu's pulse shaders
you can find them in his 0000 - Basics/Shaders/TheEmuLib.Scheduling directory
Their documentation is in rem lines in the various shaders
http://www.theemusnest.eu/scenes/Zips/TheEmuLib/0000%20-%20Basics.zip
@Theemu, thanks a lot, If peeps are looking for TheEmu's pulse shaders
you can find them in his 0000 - Basics/Shaders/TheEmuLib.Scheduling directory
Their documentation is in rem lines in the various shaders
http://www.theemusnest.eu/scenes/Zips/TheEmuLib/0000%20-%20Basics.zip
Z22
Joined in Aug 2017 1166 post(s)
January 5, 2018 (edited)
Think i have some errors in there somewhere... it shouldn't have that line near the edge.
Think it's my cuttoffs are starting to low(0.05) so none of the girl gets clipped out for the first few layers.
Think it's my cuttoffs are starting to low(0.05) so none of the girl gets clipped out for the first few layers.
You are not allowed to participate yet
As a free user of iStripper, you are not allowed to answer a topic in the forum or to create a new topic.
But you can still access basics categories and get in touch with our community !